
Wow, here we are in late September after another summer has flown by. Evening temps have been dipping into the high 40s here in Michigan, bringing with them one of the best times of year to enjoy driving an S13. All three of my daughters are now attending school and are already wrapping up their sixth week. It’s been a big change and adjustment for all of us, but it’s also a really exciting shift into this new season of life with a fifth and third grader at home in addition to a kindergartener.

I haven’t spent a ton of time working on my cars lately with everything we have had going on, but there have been some pretty exciting developments. As I mentioned in my last post, I wasn’t able to get the hatch to go into gear the night before my S Chassis BBQ and had to push it outside the morning of the event. After attempting to bleed the clutch again later that week, I ended up replacing the clutch master cylinder and adjusting the engagement point on the pedal. This worked like a charm and I was finally able to drive the car around the block for the first time in 2022. The month of July is pretty late to achieve that goal, but the excitement level always remains the same when it finally happens.

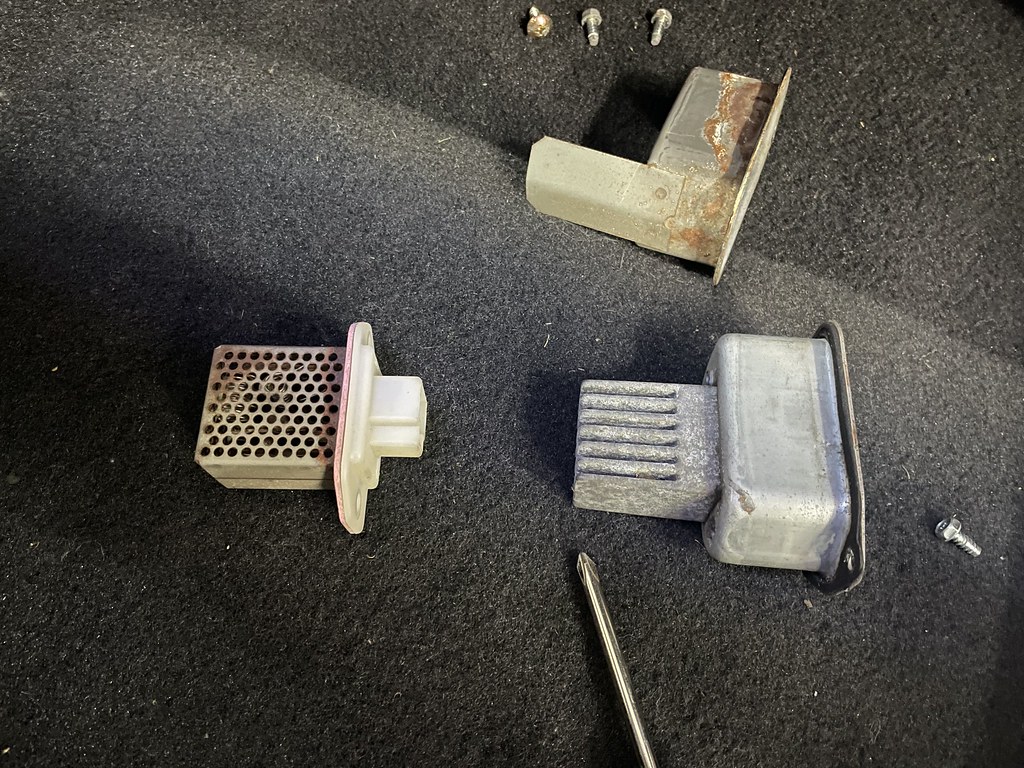
After getting the car on the road, I noticed that the blower motor only worked on the high speed setting. This was a bit odd since it worked before I tore it apart, but I did end up throwing my friend Tim’s AC setup in the car during the off-season. I realized his setup had a JDM blower motor resistor installed for the digital climate control (DCC) setup, so I swapped back to my old one (that I had kept luckily) and that solved the issue. This prompted me to get out the DCC setup I purchased from his part out and look things over a bit. As it turns out, I’m missing a couple of the needed components- but I should still be able to get it to work someday. I want to have the AC system charged and confirm it works properly before I attempt the install, so that will have to wait until next year. I’ve owned a couple different DDC setups over the years and have never actually installed one, so it would be really cool to finally make it happen.
My next move (no pun intended) was finally installing my NeXt Miracle Cross Bar that I purchased back in 2020. I think I’ve owned four of these now if memory serves and it’s always been one of my favorite pieces for the 180SX. I’ve been dragging my feet on installing it since it requires you to remove the rear seat belts. I always enjoy being able to take my daughters in the car with me, so I haven’t wanted to do that. But with the girls getting older and being right on the edge of sitting in the front seat (and having a second S13 available to drive) I decided to go for it. Installation can be a bit of a hassle, but I’ve done it so many times now that it really wasn’t so bad. It’s such a cool looking piece!
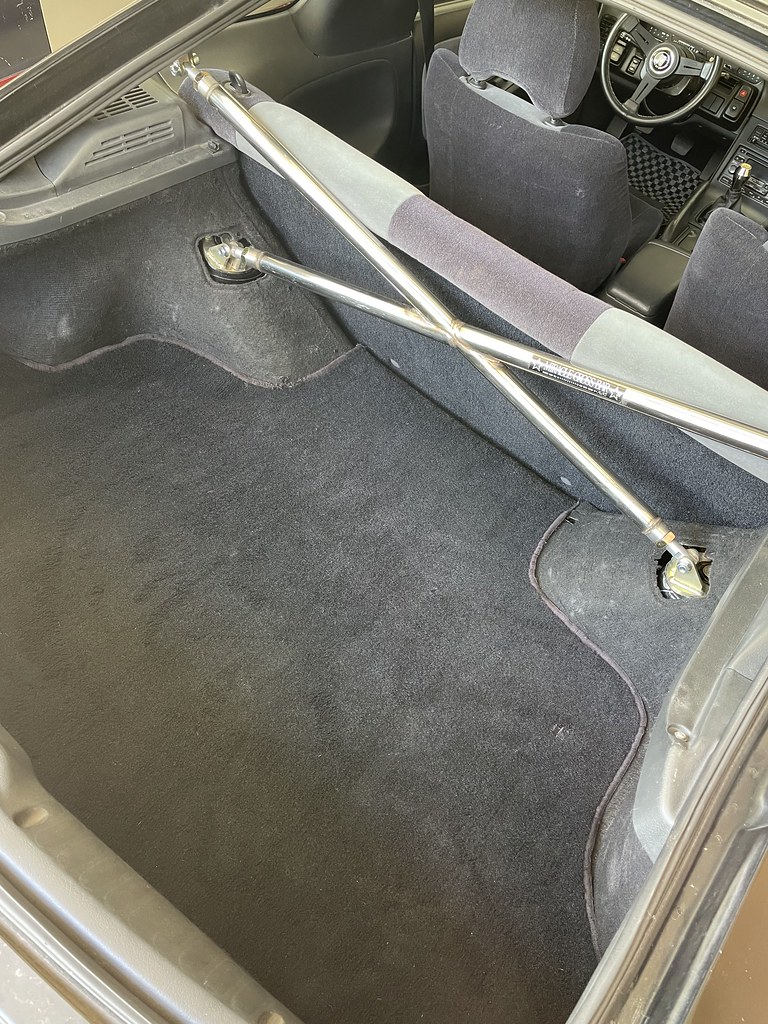
While working in the hatch area, I installed some factory plastic clips that attach the rear carpet to the upper portion of the back seat. I’ve been running without these for many years and saved some from a car I parted out a while back. It definitely helps to hold the carpet in place and keep it from looking wavy along the back seat.

After all of these projects were completed, it was time to take the car out on the main road outside my neighborhood. When I did, I found a nasty vibration from the rear of the car at speeds above 30 MPH. When I jacked the rear of the car up, I found there was some play in both rear wheels. I messed around for a while with tightening different things, but ultimately found the wheel bearings were causing the issue. This was disheartening as I had just shelled out for brand new OEM S14 rear hubs and bearings, but thanks to the help of some people on Instagram I found that I pressed the hubs into the bearings incorrectly and damaged them. An expensive lesson, but an important one. I did not support the bearings with an arbor plate when I pressed them and this caused the damage as it pressed the inner races of the bearing out the back side.

I ended up ordering some cheap bearings from Rock Auto and replacing them. I took the car for a drive again and found the same issue. Next, I swapped the hubs and bearings from my coupe onto the hatch- but the issue persisted. It was during this test drive that I realized I had not tightened the driveshaft bolts back at the differential. I tossed the car up, tightened the bolts, and was delighted to find that the issue was gone. Again, another stupid mistake, but I was so glad to have the issue behind me.
Next on the docket was installing the new sub harness for the rear hatch. Back when I got the car, I cut the harness (per the internet’s instruction) to replace my hatch with a rust-free wiperless unit. Fast forward to today and the rear wiper system had really started to grow on me again. I sourced a complete setup from a part out and took the first step towards reinstalling it by fishing the harness through the rear hatch. It was a bit tedious, but a stretched out metal coat hanger and some patience got the job done.

All of these small projects in the garage were a lot of fun. It felt great to get some wins and be back out there again, even if I was only working on quick tasks each night. I kept the privacy cover from a part out to modify for use with my Miracle Bar, so I took some quick measurements and started cutting. A dremel made quick work of cutting the cover, and I was able to make it fit quite nicely. I had done this once before years ago but rushed it and didn’t do a very good job. I prefer the look of the Miracle bar without the privacy cover, but it’s nice to have on road trips to conceal my cargo and keep a cleaner appearance.

Next on the docket was installing my front speakers. I used the same Pioneer units and Amazon templates my buddy Kev recommended and the install was pretty straightforward. I have been dragging my feet on purchasing an aftermarket head unit since choosing one is a bit overwhelming and I hate the look of them, but I’m hoping to do that soon so I can test the speakers and finally enjoy having some music in the car. I had a short stint of using a tape adapter with an iPod and the blown factory speakers many years ago, but it was short lived as the tape deck stopped working. Having a working radio is a pipe dream for me much like having AC, so if I can manage to get both working next summer I’ll be blown away.

Lately I’ve had the urge to add a few cool pieces back onto the car. It’s been through many stages over the years, and while it’s nice to have things feel really nice and factory, I miss the cool parts sometimes. I found an opportunity to snag a super clean set of white face Defi Link Meter II gauges on Yahoo! Auctions Japan via Jesse Streeter and bit the bullet. I must have owned 5 or 6 sets of these now and they’ll always be my favorite, so I was really excited about finding such a nice and complete set. I elected to swap my dashboard back to the car’s factory dash that I modified to house four 60mm gauges some years ago. I’ve done this so many times now that I was able to get it done during a lunch break while working from home, so that was a plus! I haven’t installed the sensors or wired them up yet, but at least the tedious process of swapping the dash is behind me.


While I was at it, I also reinstalled my Trust GREX shift knob to spice things up a bit inside the cockpit. The chrome compliments the Miracle Bar out back quite nicely. With the interior getting a bit more spicy again, I also tossed my black and gray checkered floor mats in. I scored these on eBay many years ago and really like them because the checkers are smaller like all of the old mats from Japan. I wish they were a cool brand and specific to the S13, but they get the job done.

Speaking of cool parts I miss owning, it’s been quiet a while since I had a bucket seat- maybe five years? And while there’s a lot of inconvenience with it, they can actually be quite comfortable. With my rear seat belts removed anyway, I don’t really need the easy access to the rear seat that the factory seats provide. A really clean original FRP Bride Zieg II popped up for sale in Thailand and I couldn’t pass on the chance to own one again. Of all the seats I’ve owned, my Zieg II was by far the most comfortable. I wish it was a kevlar back Pro Type, but I can appreciate the more subtle look with a kouki 180SX passenger seat.

I went with a tried and true Bride FG seat rail that I sourced from RHD Japan, as well as a set of Bride mounting hardware for the seat (that I of course forgot to order when I ordered the rail.) That should be here next week and then I’ll finally be able to install it. I also snagged a really clean original Bride head pad for the seat from a seller on eBay that removed it from their seat when they bought it new and had it sitting in a box in their garage for the last 10+ years. It was even a reasonable price which was a nice surprise these days.


As far as parts go, a couple other items showed up. I have had a few sets of 180SX window visors over the years and I have been worried they’ll be discontinued soon. I’m not sure I actually want to use them, but I found a vendor that hadn’t updated the price in many years and offered $10 shipping to boot. These visors cost a grip to ship properly, so I reached out to them and found that the info was correct and they had one set in stock. I snagged them and put them in storage for a rainy day. Who knows, maybe I’ll end up using them eventually.

The other item that arrived after a 3 month wait was a lower metal garnish for kouki 180SX tail lights. This is another item I didn’t really need, but bought one after hearing all of the fuss that the item had been discontinued. After doing my homework, it seems it is still being produced and I was able to get one for less than half of what other places were selling them for – I just had to be patient. I’m not sure what the miscommunication was, and I’m sure they’ll indeed be discontinued eventually, but from everything I’ve seen all of the kouki 180SX tail light components are alive and well – at least for now. It’s a good feeling to have spare lights and a spare lower garnish in case anything ever happens to mine.

So back to the car itself- the next order of business was getting an alignment. I haven’t had one in years on the hatch and it was needed after modifying both the front and rear suspension. To my disappointment, I found that the rear hubs still had some play in the new Rock Auto bearings. I am pretty confident I pressed them correctly this time, so I’m not sure what’s causing it. It wasn’t as severe this time, but I elected to take the ones off of the coupe (again) and put them on the hatch for the time being. The coupe is awaiting a replacement pair that should arrive today- then I’ll have it back together and ready to head to my mom’s for winter storage.
With insurance added to the car and the hubs replaced, I made the 45 mile drive out to Detroit Drifting Co. for an alignment. My friend Mike is the owner and a really great dude. He was able to get the car up on the rack and dial everything in for me. I’ve known for a few years that the rear fender pull isn’t even on either side, so we had to settle for about -3.2° of camber front and rear. I intend to pull the driver’s side quarter panel another 2-3mm to hopefully end up with about -2.5° of rear camber. Up front, I may run a 5mm spacer and add a small amount of camber- but nothing more than -4°. However, I’m happy with how the car looks and drives right now. Wheel fitment is always something I like to have perfect when I can, but I can live with this until my next alignment.

A lot of what motivated me to get the hatch out was my Vibe breaking down on me one day heading home from work. I lost power and suspected it was the alternator, but it ended up being a healthy dose of corrosion on the battery causing it not to charge. After towing it home, I ordered parts and let it sit for a few weeks, driving the hatch to and from work instead. I did eventually get around to installing a new alternator, battery, and ground cable- so hopefully that solves the issue and it’s ready to complete another tour of duty this winter.


My latest accomplishment is finishing the installation of the factory rear wiper. After testing the motor, I found that it was stuck on and would not turn off, even when pressing the button. As it turned out, the “uncut” harness I was sold had been cut and twisted back together without any solder. Many people told me their harness wiring broke at the point where it travels into the car due to opening and closing the hatch over the years. I was annoyed, but ultimately used my old chassis harness to add some wiring and extend my harness a bit to hopefully avoid it breaking someday. Once I did this, everything worked as it should. I made a template out of cardboard to determine the placement of the wiper hole in the hatch, got some really helpful dimensions from Noel on Instagram, and entered the moment of truth. It hurt a little to drill into a wiperless hatch, but the end result was worth it. I still need to wrap up some details with the install, but I am really happy to say it’s there now and working properly. I used it during a rainy commute this week and it worked like a charm.


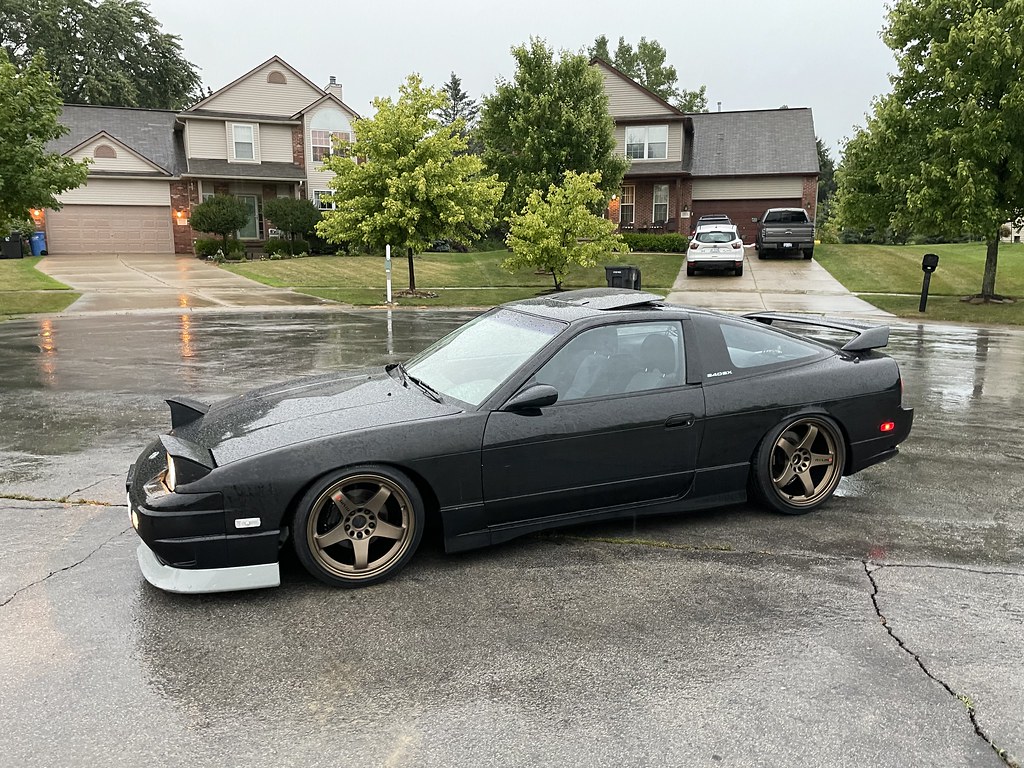
To be honest, the hatch really isn’t looking it’s best right now. In fact, I would argue this is the worst it’s ever looked. But let me tell you, even with the car needing some TLC, even with crazy construction and tons of traffic, and even with annoying gas prices, I’m so thankful to be driving this car and enjoying it here at the end of the summer. I think a lot of times there’s two paths to take with your build- lower your standards a bit and get to enjoy driving the car in an unfinished state, or tear it apart before you have the means to finish it and wait for the pursuit of perfection. While it drives me nuts, I’m so happy to be on the former level right now. I can’t tell you what driving this car to and from work every day does for my mood and appreciation for it. When you don’t drive a car for a long period of time, you lose your connection with it and it just becomes another unused asset. Another burden. But getting out and logging some miles, even if it’s not complete or what you feel is your best work, is the best motivation there is.

I recently decided to throw a pair of TE37s on the rear to see how the car looks with LMGT4s up front. I’ve never been into the mismatched look, especially because I don’t drift, but this is a combo that is too good to pass up. It’s not a bad look!


As for the coupe, things have been pretty stagnant. I did install new headlight rubber seals and trim rings a while back as well as some bulbs in my temporary brick headlights. One of the housings is broken on the back and the inner shroud was loose. I ended up taking it apart after heating it up in the oven, repainting the black housing inside, and sealing it back up. The chrome was peeling on the shroud, so I painted it with some silver paint I had laying around. I’m not happy with the fix as it doesn’t feel like my desired level of quality, but I have to remind myself that these are temporary. Once the car is painted someday, I’ll install my brand new set and sell these.

I couldn’t resist grabbing some yellow bulbs for the fog lights. They work really well with the Key’d Performance fog light harnesses I picked up a while back. When you depress the button typically used for the pop-up headlights, it turns the fog lights on. I don’t expect them to last very long since they’re cheap ones from eBay, but we’ll see what happens.

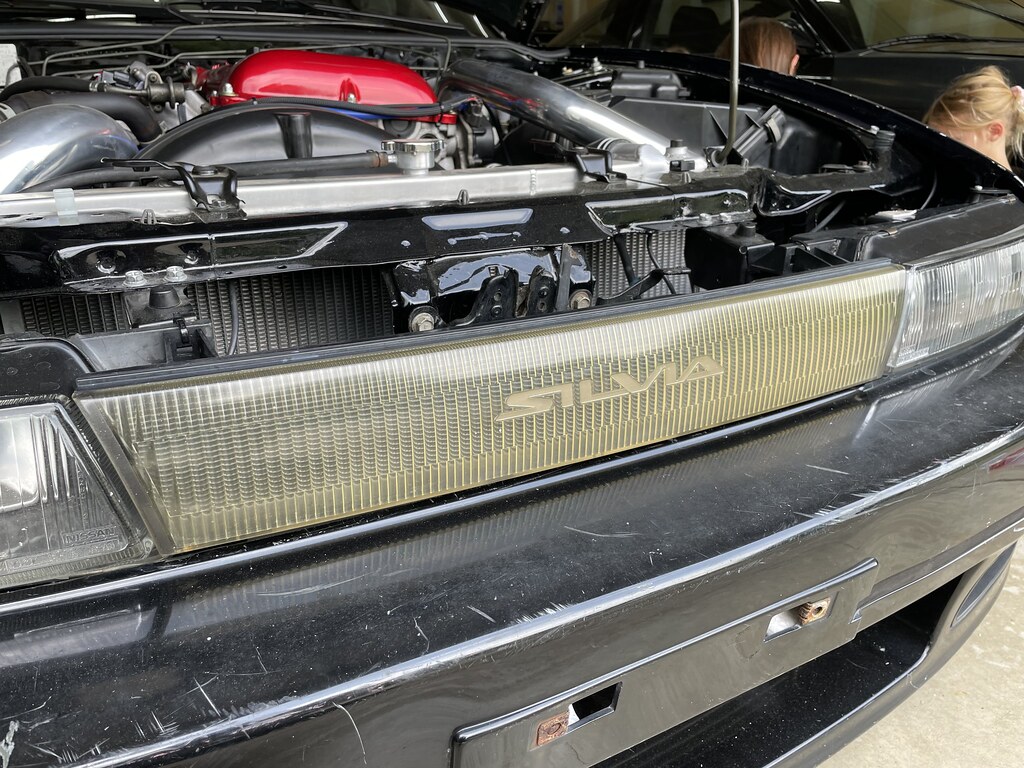
I also started sanding my temporary OEM Silvia center grille. It had yellowed a lot over time, so I worked my way from 800 down to 2000 grit wet sanding to try to make it look clear again. I need to try polishing it with something to bring the gloss finish back, but I would say it’s an improvement overall. Again, not too big of a deal since I have a brand new one I can use once the car gets painted, but it will get the job done in the mean time.

As I mentioned, the coupe is sitting right now awaiting some replacement rear hubs. Once those arrive, I’ll move it over to my mom’s house for winter storage. I don’t have many plans for it this year aside from sourcing a set of 17” wheels and tires. Once I am able to accomplish that, I definitely want to finally spend some serious time driving it. The car feels a bit sluggish, like something isn’t right with it, so eventually I need to work that out and get it running better. It starts and idles nicely and doesn’t seem to be breaking up, but generally seems down on power. I would really like to add a bucket seat and some gauges as well, but we’ll see if that actually happens. Next season will probably be the deciding factor on if I keep the car or not. It feels like a waste having it just sit around for another year. Ideally I would like to keep it, but we’ll see what happens. I really think it could be a great car and very rewarding if I am able to stick it out and finally finish it.

Anyway, that just about brings you up to speed for my very busy August and early September. I’m looking forward to enjoying the hatch for as long as the weather allows. I’ve got a couple more exciting things in the works that you’ll hear about next time, but for the most part it should be pretty uneventful.
One final thing- a photo with the car we decided to recreate around Alexi’s recent fifth birthday:


Thank you as always for stopping by and taking the time to read the blog. I really appreciate it! Have a great weekend.
Damon
