This week has been a relatively quiet one as far as car things go. But when it takes this long to purchase and import a car, there are bound to be some quiet ones, right?!
I got confirmation from Richard that my 180SX arrived safely at port and is currently being booked. He said most of the cars he has imported have been booked within a month of arriving, so I’m crossing my fingers that the car will have a ship assigned and begin its journey to the USA within the next few weeks. The fact that I am buying this car begins to feel a little bit more real with each step in the process being checked off. I’m anxious, but really trying not to dwell on it too much to avoid losing my sanity, haha.
I received the car’s VIN number this week which allowed me to learn a little bit more about it via GTR Registry. My good 180SX friend Maq had mentioned that black kouki 180SX Type X cars with a sunroof were relatively rare, which he was definitely right about. As it turns out, this car is 1 of 9 KH3 180SX Type X with an automatic transmission and a sunroof, which I thought was pretty interesting. There were 76 total 96-98 black Type X 180SX produced, which makes me that much happier that I bought this car. With numbers that low, waiting it out may have been a bad choice. Granted, I sort of wanted a different color other than black initially, but that’s OK. Sometimes fate has other plans.
As far as parts go, this week was pretty light. However, I did receive a package from my good friend Frankie at Faction Motorsports that contains a new GReddy LS Spec intercooler kit for the 180SX. I’ve owned a handful of these over the years and really love the fit and finish of the kit – as well as the cost. I almost kept a kit from one of my 240s since both were relatively new, but really wanted to have brand new parts for the 180SX build whenever I could. If you are in the market for one of these setups, I definitely recommend reaching out to Frankie at Faction. It arrived in just two days!
No updates to report on the 240 shell. I am still working on sourcing the items needed to make the car a roller, but I am pretty close to set on that. In the mean time it continues to sit until it’s picked up about a month from today.
Earlier this week, JY and I were talking about “tribute builds.” He explained that he is really into building cars that pay homage to specific cars of our past, much like he just did with his S13 Silvia. I joked that my 180SX build is going to be a CamryOnBronze tribute car, mostly just to be funny. And although it sounds a bit arrogant, that is actually sort of my plan. Now that I only have one car again, I am excited to combine all of the best aspects of my 240SX hatch over the years into one final car that I can be proud of. I’ve been through the process so many times now that it’s very clear to me what my favorite aftermarket parts are, so I hope to sort of collect all of the heavy hitters and have them on hand to be swapped out as I see fit. I’ve never really been able to keep parts when I swap them out for others in the past, but I hope to change that this time around.
As far as future blog posts go, I’m planning to zero in on my plans for each aspect of the 180SX build: interior, exterior, suspension, and drivetrain. I think it should be pretty fun and will definitely help keep me on the right track and hopefully allow me to follow through.
Thanks as always for swinging by to check out the blog. I appreciate it! Take it easy.
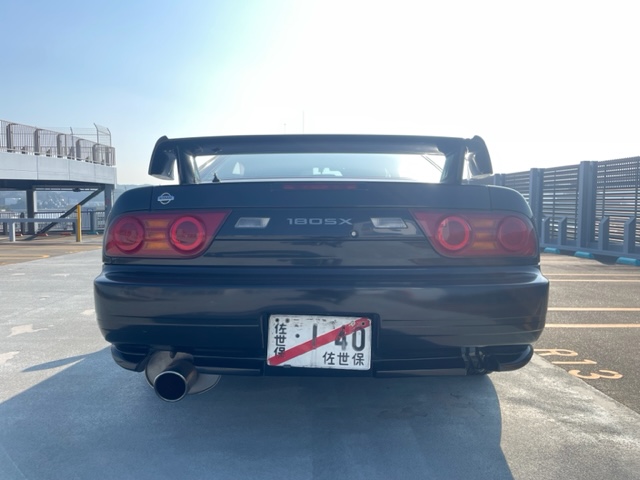
Well, as far as the process of importing a car goes, this past week was a pretty exciting one. I first reached out to Dario, the seller of the 180SX I purchased, in November of 2023 to discuss the car. I committed to purchasing it in late January, and was finally able to get payment sorted out by mid February. Yesterday, the car was finally picked up for land transport from Sasebo to the port for export. Dario was able to swap the factory wheels onto the car and send me a couple photos and videos of when the driver arrived to pick the car up.
It was so cool to see photos of the car in this environment and know that it’s finally on the way to me. I am very grateful to Dario for taking these photos and how great he has been to work with in this process. I am working with Jordan Tweed of Tweed Autogarage for the import process on the Japan side, while Richard from Run Matsuo is assisting with things on the US side. Richard has been such an amazing resource so far – I highly recommend him and really appreciate his help so far.
It sounds like the car will remain in port for several weeks while a ship is booked to the States, but hopefully it will find its way onto a boat sooner than later. Fingers crossed!
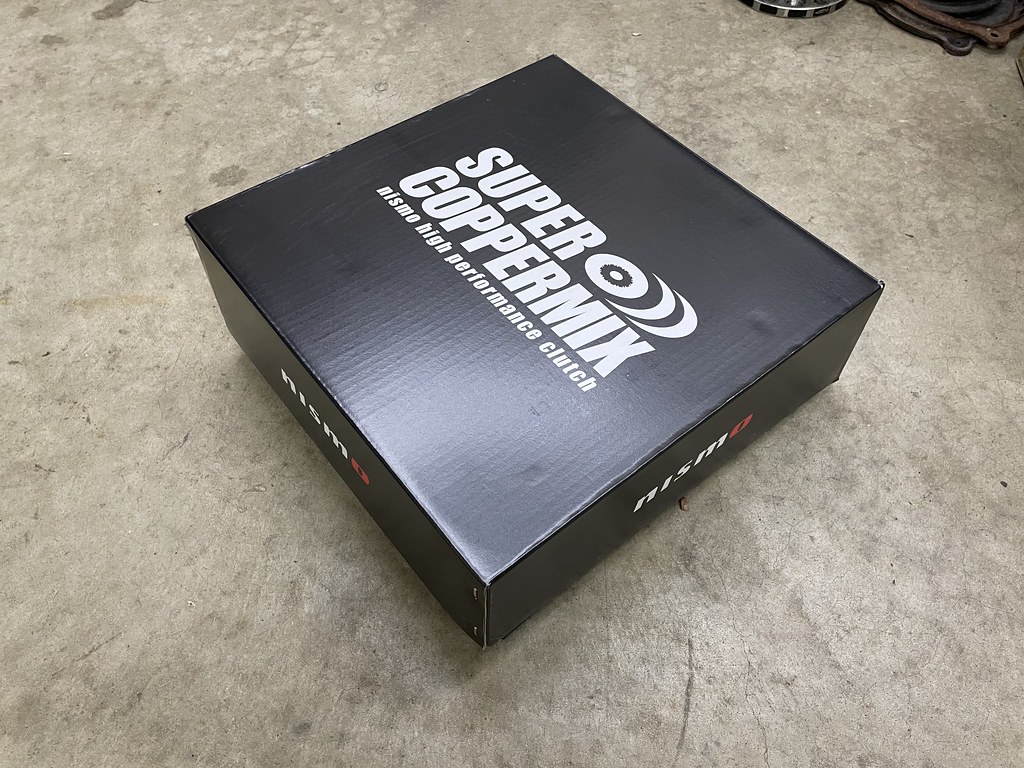
Here at home, I received a couple more packages this week. The first was my NISMO Super Coppermix twin disk clutch kit. I have never had a cool Japanese clutch in any of my S13s before, and have always dreamed of a twin disc primarily for the sound it produced. It will absolutely be overkill for my needs and hopefully won’t be too terrible to drive with, but I just couldn’t pass up the chance to own a cool NISMO clutch like I have always wanted to.
Pretty awesome to finally see one of these bad boys in my garage…
My 180SX feels like a unique opportunity to acquire the parts I always wanted to have on both of my 240s, but never really could for financial reasons. Focusing on only one car and selling so many parts that were redundant from my hatch (like most of the aero, for example) has freed up the budget considerably to allow me to make this happen.
Jimmy and I were discussing how he enjoys making “tribute” builds, or cars that pay homage to famous cars from the past. I joked that I want my 180SX build to be a CamryOnBronze tribute build, which is pretty funny to think about. And even though it was a joke, I kind of really like that mantra. I want this car to encompass all of the best aspects of my 240SX hatch build over the years. All of the parts I sold that I wish I had kept, or all of the things I wanted to do but never had the extra money to make it happen. I really like this concept a lot, and I hope I am able to pull it off. This sort of feels like my final contribution to building these cars, and I am really grateful to have an opportunity to put one together with all of the experience and knowledge I have gained over the years.
It’s weird to see the new Nissan logo on all of the parts I am buying. Kind of a bummer.
Later in the week, one more box from Japan showed up. This one included a number of OEM restoration parts that I have been sourcing to help freshen up the car. The first included a new coil pack cover with fresh bolts, as well as washers and nuts for the valve cover. I will have to take a look at the valve cover when I get it and decided if I want to send it out for powder coating or not. I will most certainly be keeping it the factory black color though.
Next came a set of OEM drive belts for the engine. I’ve found with most of these parts that I am just rebuying all of the things I purchased for both of my SR20DET swaps in my 240s over the last few years, which makes things a bit easier. Fortunately I have found most of it is still available, with the exception of some smaller things.
I ordered just about every coolant hose for the SR20 that I could get my hands on. A lot of the straight hoses have been discontinued for some time now, but you’d be surprised how many others are still in production. As always, I will go into more detail with all of this stuff (part numbers, locations etc.) when I get the chance to install them on the car down the road. I am sure it will be sort of a long process.
Much like the coolant hoses, most of the crankcase ventilation hoses are still available as well. A lot of this stuff can just be replaced with random domestic parts store hoses, but it’s just too cool to have the real deal sometimes. These clean up the look of the engine a lot – not to mention I am sure all of the 27 year old hoses will be pretty brittle.
Door strikers are one of the best things you can buy for your S13 and add a really fresh feel to the car. I of course had to grab a new set of these. The screws are still on order, but should be here at some point down the road.
I scooped up some new nuts, washers and grease caps for the S14 front knuckles and hubs. Again, it feels like I am just doing all of the same things over and over again at this point, but it feels great to start fresh.
For the pedals, I picked up a new set of pads. I have some other pedal restoration items on order that should be here in the next few weeks. That will allow me to refresh the brake and clutch assemblies and have them ready to drop in before the car arrives this summer. This are really cheap from Japan – much cheaper than any stateside retailer. I think the accelerator pedal was about $2 USD.
Finally, I grabbed a new wiper cowl seal. This was one of the only pieces of weather stripping that I actually installed on my 240, so I needed a new one to complete my set. I still have all of my moldings and weather stripping that I bought for my 240s. My hope is that the paint on the 180SX is clean enough that I can have it detailed and coated professionally and be happy enough with the results to need any paint work done. If that’s the case, I will likely install all of these items I have been holding onto for so many years – which would be a pretty awesome feeling of accomplishment.
It’s been a very strange winter here in Michigan this year. We had a week or two of bitterly cold temperatures, and a couple of snow storms – but we have also had a lot of random days in the 60s and 70s. This past week was no exception, and I was anxious to work in the garage – so I decided to assemble my shifter for the 180SX manual swap. I decided not to replace the plastic carrier in the shifter base, despite being tempted. I also opted not to buy one of the brand new discontinued shifter bases I tracked down. While it would be really cool, I came to my senses a bit and decided to save some cash.
Assembled and ready to rock.
I didn’t end up using the wave washer I bought for the bottom of the assembly, as I forgot to put it in and hate taking apart the snap rings to get to it. I am sure this will not cause any issues. I am really looking forward to trying this shifter and comparing it to the stock one. I think it should be perfect.
Sadly, the one area I did not make any progress with this week was getting rid of my 240SX shell. I still need to find time to pick up and/or track down the remaining parts I need to make the shell a roller, but I found out that I have more time to take care of that as the buyer can not come pick it up until sometime in April. Again, it’s not really hurting anything being in my garage at this point, so I am not too stressed. I look forward to the day when it is finally out of my hair though.
That’s about it for this week! Thank you to everyone that has been keeping up with the process so far. I am having a great time and feel like I have my motivation back again, which is funny considering there’s not car here in the garage to actually work on. I’m so excited for the car to arrive. At the rate time is going right now, I am sure it will be here before I know it.
I just had a funny thought: I have updated the blog more times since technically not really owning an S13 than in the past couple years when I had two more or less functioning examples. Kind of weird how that works, right? I guess it has really freed me up mentally to start from a clean slate. The transition of parting ways with two 240SXs and moving to a singular 180SX has felt like a total reset that I desperately needed. I hope the feeling of freedom and the mental weight I have shed in this process continues as I focus on only one vehicle, because it’s been a huge breath of fresh air so far.
I hope to have a photo of the car on a flat bed with the factory wheels in place by this time next week… fingers crossed!
I have a few exciting updates to share this week (at least in my opinion, anyway.) Let’s start with the 180SX. Last week I finally received an official invoice for transporting the car and was able to pay the importer’s fee, shipping to the USA via sea, and land transport to take the car from its current location in Southwestern Japan to Osaka for shipping to the states. I was able to nail down a pickup date of March 14th with the importer and the seller, which took a fair amount of back and forth. It already feels like ages ago since I paid for the car, but that’s to be expected with this process. I said I wanted to experience it, so here I am! Hopefully everything goes smoothly with pickup and transport next week. From there, I believe the car will be waiting until the next available ship. I am telling myself I will not have it in time to enjoy the 2024 season at all here in Michigan with the hope that it arrives earlier – but we’ll see what happens!
Meanwhile, I have continued to stockpile items for the car’s highly anticipated arrival. The first item I secured this week was a NISMO sport shifter. I’ve tried a number of shifters over the years including C’s, Tomei, and B&M but was never super happy with any of them. I ended up switching over to a stock shifter and had been using that for the last several years. It’s just tough to beat it, especially for street driving.
I’m told the throw reduction on the NISMO shifter is pretty minimal, which makes sense as most NISMO items are a pretty small change over the factory components they replace. I talked to a few people that have them and I think it will be a nice in between. I actually ended up sourcing what must be a slightly older stock item since the box has the mid NISMO logo on it. I went with one that I found on Yahoo! Auctions Japan and used Streeter to import it as I found that these are apparently on backorder until the end of July. Though I am not in a rush since I don’t even have the car yet, I figured it was worth paying a little bit more (but still much less than any stateside vendor) to have one ready to go when the car gets here.
If you haven’t sensed a theme here yet, my hope is to source just about every modern NISMO component still available for the S13 chassis for my build. I think it’s so cool that items are still being produced for this chassis by Nissan, even if it doesn’t seem to get the same support that the R chassis does. NISMO parts just generally sort of fit the relatively conservative tuning mindset I have acquired as I have gotten older and I am really excited about adding all of this stuff to my mod list. I had the majority of these parts on my 240SXs that I parted out, but I thought it probably made sense to sell those items and start with fresh, new components wherever I could for the 180SX build. I think the satisfaction it brings will be worth it in the long run.
So, let’s see – I’ll start with the NISMO suspension components first. I’ll share more detailed photos and part numbers etc. later when I actually begin installing all of these items on the car. I started with bushings, including steering rack bushings, rear knuckle bushings, and rear subframe bushings. I almost kept my old rear knuckles and subframe to save myself the hassle of pressing them again, but thought it would be cool to keep the original parts on the 180SX that came with it. Plus, it’ll give me something to do down the road when I am in the mood for a project.
Next, I sourced what is more or less the same suspension setup I had on my 240s with NISMO front and rear lower control arms. I decided to stick with the S14 front lower control arms again for the additional track width and camber adjustment, in addition to being able to utilize S14 front knuckles and OEM five lug hubs. I liked this setup a lot on my hatch, so I decided to just copy/paste the setup. I also bought what is probably my favorite NISMO piece of all time – the power brace.
Finally, I decided to round out my NISMO order and grab a few drivetrain related items. This included engine mounts and a transmission mount. While I love the engine clearance and lack of vibrations with these, it does bum me out that I can’t run a strut tower brace with them. However, I think it’s worth it to avoid running more aggressive engine mounts. I also picked up a reinforced clutch pivot ball and a braided NISMO clutch hose to replace the flimsy, aging rubber one on the manual clutch line setup I sourced from Japan. Unfortunately I had to ditch the NISMO clutch slave cylinder I had been using on my previous cars due to the clutch setup I decided to run in the car, but I think it will be a worthy trade off. More on that later when it arrives – possibly next week?
I am really excited about the next set of parts that arrived this past week. Many years ago, I sourced a couple pairs of Cusco adjustable suspension arms for my 240SX hatch from a seller on Zilvia. They came in really cool boxes and I loved the blue color. Cusco has always been one of my favorite Japanese tuning companies. When I bought my chassis back after parting it out, I went with SPC arms as they were much more affordable and got the job done well enough. However, I always missed running Japanese components on the car. I often dreamed of replacing them with Cusco components, but never really had the extra cash to make it a reality.
Fast forward to this new clean slate I find myself in, and I was able to make it happen with the full fleet of Cusco adjustable arms: front tension rods, rear traction links, rear upper control arms and rear toe arms. I know it’s silly, but it feels so cool to be collecting all of these parts from Japan for an actual 180SX. Truthfully it doesn’t really feel real, and probably won’t until the car is sitting safely in my garage. But the excitement is building by the week. Again, I’ll share a better look at these in a future post when I begin getting everything put together.
I scooped up a set of Moonface Racing front sway bar links to try out. I noticed on my coupe that the stock end links were at a crazy angle, especially when I was super low on the 15″ Work Equips. This caused the sway bar to sit at a funky angle and the bushings to become distorted. I am hoping these shortened end links will help with that issue.
Finally, I got out my set of DMAX Super Street coilovers. I actually bought these months ago to replacing the aging Stance coilovers on my 240SX hatch (it still feels so weird to keep calling it that, but I feel I have to now to avoid confusion) as I had a set of DMAX coilovers back in 2012 or so that I really liked. They have a really cool camber adjustment feature up front and seemed to work well enough when I had them previously – not to mention they are MUCH cheaper than most coilover offerings out there these days as the prices have increased dramatically. I know they go plenty low, so hopefully they will serve me well.
As for my 240SX shell, it’s still hanging around. I finished installing the rear subframe last weekend and also bolted up the front subframe, arms, and knuckles. I still need to get a couple items together to make it roll and to nail down a pickup date with the buyer, but I hope I will make some progress on that soon. For the time being it is a bit of an eyesore, but a minor inconvenience to have in the garage. So much of my current situation is really testing my patience, but I know good things take time.
If anyone reading this is in need of an S13 Silvia slicktop headliner, a crack free S13 dash, or a crack free S13 dash with four 60mm gauge holes in it, let me know! I am still actively trying to sell these items from my previous cars. Unfortunately, these items are too large to ship – so they would need to be picked up in Michigan. I can also have them transported to NJ with the shell if that is closer to you. Let me know!
That’s about it for this week’s update! I hope to continue to go into a little more detail on my plans for the 180SX next week. I think I am beginning to form a pretty clear game plan, but it always helps to type it out and ensure everything seems to make sense. I know I frequently change my mind, so that is always something to look out for.
Thanks as always for stopping by and have a great weekend!
It’s funny how things work out sometimes. When I had both of my S13s at this time last year, I had no motivation to work on them (for many different reasons.) A year later, I have tons of motivation but no longer have a car to work on. It’s been an interesting shift to say the least.
Last week, I was taking a look at the used Silvia clutch pedal assembly I bought and comparing it to the reinforced NISMO bracket. It didn’t seem to make a lot of sense to me. The two bracket and spring designs just didn’t look the same. As it turns out, the set of pedals I bought on eBay was not from a Silvia/180SX, but from a USDM S13. I ended up returning them and purchasing a different set, which worked out well as they were quite a bit cheaper. I think they may have been so cheap because they’re a little rough and have an old set of Impul pedal covers installed on them, but I ordered new rubber pads for them a couple weeks back – so that won’t be an issue.
Pedal set: take 2.
I wonder what the car that these pedals were removed from looked like…
I also did some research and visual inspection on the clutch rebuild kit I purchased and found that the return springs are different between the US and JDM S13 clutch pedal assemblies. I ended up selling the rebuild kit I bought as it was clear that the return spring would only work on USDM pedals, and I found that the JDM return spring has been discontinued. So consider this a heads up if you plan to buy a rebuild kit for your RHD S13 – the return spring will not work, but all of the other components will. Also note that the NISMO reinforced clutch pedal bracket will not fit a USDM S13.
JDM clutch pedal bracket (Left) vs. USDM bracket (Right.)
I plan to order the clutch refresh components from Japan as I found them to be quite a bit cheaper over there, even with shipping and exchange rates. I’m also going to look into snagging some refresh items for the brake pedal.
Some rusty but trusty items to get the 240 shell rolling.
As for my old 240 shell, I was able to source some items to make it a rolling chassis before the buyer comes to grab it in the coming weeks. I picked up front and rear subframes, knuckles, control arms, etc. from my friend Allen last weekend. I tossed the rear subframe on the car quickly last night, but plan to spend some more time installing these items this weekend. I’m hoping to source the remaining parts next week and hopefully have a pick up date nailed down soon.
Crusty subframe on its way up,
Things are moving at a snail’s pace with the 180SX. The importer has a truck lined up for taking the car from its current location to the port, but I haven’t heard yet when this will happen. Fingers crossed that I will get some good news on that front soon.
So that’s about it for this week! Thanks as always for reading my rambling. Have a great weekend!
This week’s post is a little light on updates, but I do have a few things to share. I’ve been communicating with the seller of the car and the importer a bit trying to coordinate getting the car transported via truck from its current location to the Osaka area. Unfortunately, there wasn’t a port available to ship from in the car’s original location, so we need to go through some ground transport before it hits the boat. It’s been a painfully slow process so far, but as long as we continue to make progress I will be happy.
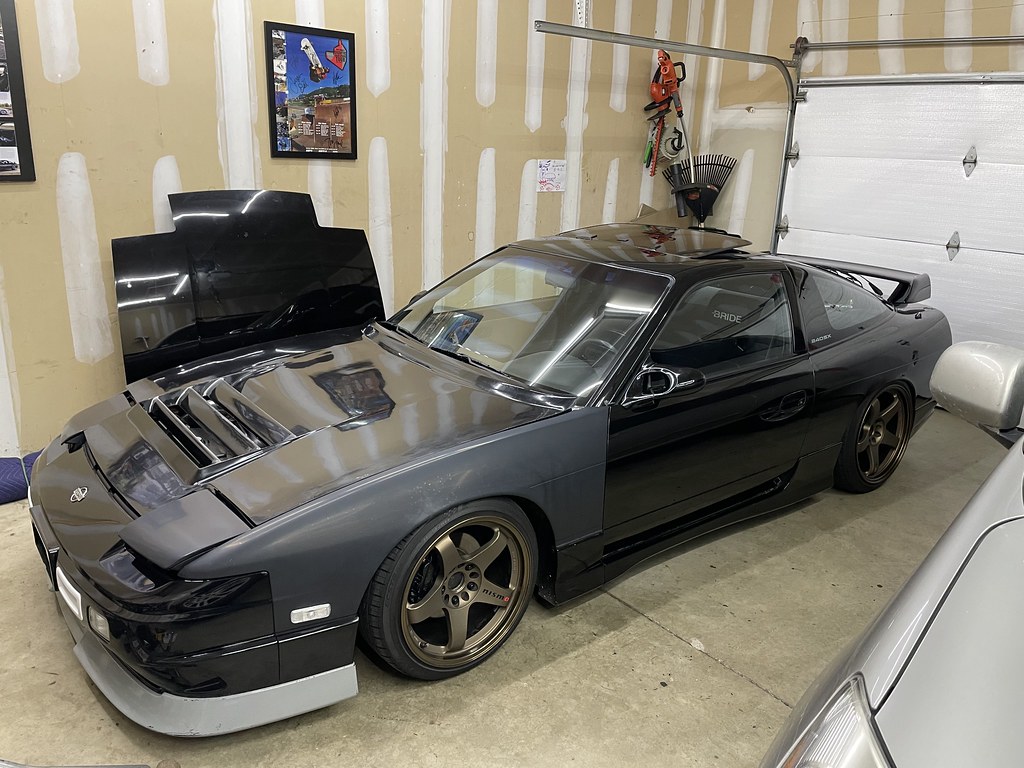
I also wanted to call out that the car will not come with the AVS VS6 wheels shown in the listing. It will instead be transported with the factory late model 180SX snowflake wheels, which I am pretty excited about. I guess the tires are in pretty bad shape, so I am considering replacing those when it arrives so that I can enjoy the car a bit before tearing into it – but we’ll see what happens. I’m also planning to remove the faded OEM window visors ASAP. I’ve got a new set stored away, but I’ve grown to not really love the look like I did many years ago. I’ll probably end up running without them.
My hope in the end is that I can preserve the car’s factory paint job and get it to a state that I am happy with. It’s no secret that my 240’s paint drove me crazy, but a big part of that was the fact that I didn’t know how to take care of it. I am hoping with putting in a fair amount of work (and cash) on the front end, I can get this car to a state I am happy with without having to paint it and keep it that way for years to come. At least it already has the complete factory aero on it, so I don’t really need to make any exterior changes. I still have my front bumper with R33 GTR N1 ducts, but I am undecided on if I will use that right away or not.
As far as parts arriving this past week, the first was a rubber shift boot for the transmission tunnel. I can’t tell you how many of these I have sold over the years, so it felt silly to have to search for one and pay someone else for it – but I will need it for the manual swap. These are still available new from Nissan, but it’s over $200 for all three pieces. I decided the money could be spent in better places, so I scooped this used one and plan to clean it up as best I can before installing it.
Next up was an order from Jesse Streeter in Japan. Just a day or two after paying for the car, I stumbled upon a complete clutch line and damper assembly from a 180SX on Yahoo! Auctions Japan. I had almost forgotten that the USDM and JDM clutch lines are not the same, so this one nearly caught me off guard. I really wanted a factory hard line instead of an aftermaket braided one, so I was stoked to find this. Some of the components are still available new, but not all of them – so this was a good buy. If I understand the schematics right, I should have everything needed as far as hard lines go for converting the car to a manual transmission. I will of course be replacing the rubber clutch line and slave, which probably would have saved me some cash on shipping this half way across the world – but it is what it is.
Finally, I received what I am sure will be the first of many orders of OEM parts from my good friend Russell at NissanParts.cc. Russell has been a huge help to me since I started building my first S13 in 2009, and I have seen a ton of shops come and go in that time. It’s cool to see what he has built, and funny to be going through the same process again 15 years later.
The first group of parts I picked up are for the manual shifter assembly: bolts, washers, wave washer, snap ring and gasket. Combine these with the used base plate I bought, and I should have just about everything I need aside from the shifter assembly itself. More on that in a future update.
Next, I picked up a pair of OEM S14 ABS front five lug hubs. So now I’ve got both front and rear five lug hubs ready to go. I’ll probably treat myself to a new set of lug nuts to use with these when the time comes, but we’ll see what happens. I have been running Muteki black steel lug nuts for a while now, but sometimes I miss having something a little bit flashier.
This order also included NissanParts.cc clutch pedal refresh kit. It comes with everything to replace all of the small springs and bushings on your clutch pedal assembly and seemed like a good idea to snag. I’ll tackle this project soon when I have some free time – it’ll be a good thing to keep me busy while I wait for the car’s arrival.
I also picked up a few other things for the manual swap – a new dust boot for the shift fork, new retainer springs for the release bearing, and a manual pilot bushing. I have never had to deal with a pilot bushing swap before, so I am hoping that won’t be too big of a deal. I didn’t order a release bearing as that will come with the clutch kit I am purchasing. I hope to order that next week – stay tuned. I am still debating if I want to replace the gaskets and seals in the transmission. The last time I tried to do that as preventative maintenance, I created some leaks that weren’t previously there. I may adopt more of a “if it ain’t broke, don’t fix it” mentality with this car depending on what kind of shape it’s in when it arrives. Time will tell!
Finally, I scooped up a new OEM clutch master cylinder and slave cylinder. I really wanted to run the NISMO slave again, but it’s not advised to run it with the clutch I want to use. It’s always sad to lose a NISMO item from the mod list, but hopefully it will be worth it.
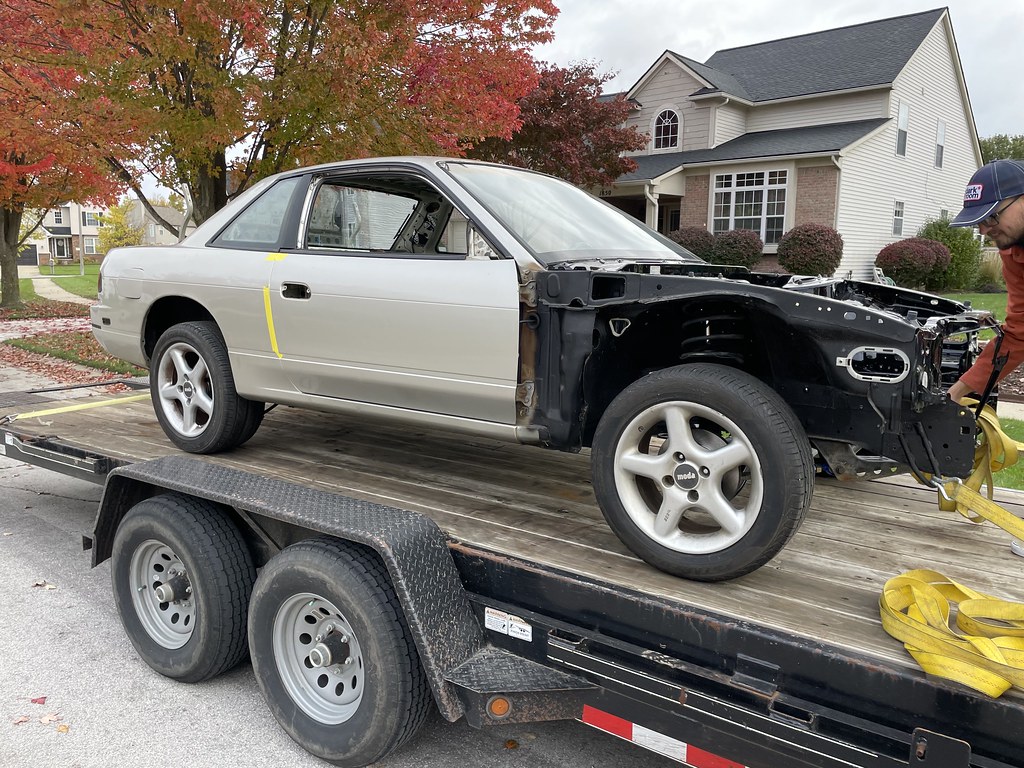
Last night I had some free time to spend in the garage that I utilized to get my 240SX shell ready for pickup. I think I finally have a buyer nailed down which is a really great feeling, and I am happy about its new home. It’s going to be a few weeks before he can come get it, but it should be worth the wait. I reinstalled a number of items that didn’t end up selling, including the HVAC setup, dash bar, steering column, dash, S14 seats, and rear hatch. I filled it with most of my remaining spare parts that didn’t sell, which feels like a huge relief. I can’t wait until the shell is gone and out of my garage. I’m trying to track down items to make it a roller to make transport easier like I did with my coupe. Fingers crossed I can do that in a timely and not-so-expensive manner. We’ll see how it goes.
That’s where things stand for the last Friday of February. I’m hopeful that I can have just about everything I want to install on the car here in my garage and ready to go by the time it arrives, which shouldn’t be too hard to pull off as I plan to keep it pretty simple. Fingers crossed things keep moving with the import process. I am so anxious to hear that the car is finally on the boat and ready to make its way to the States. At least I have plenty to work on in the mean time.
Thanks as always for stopping by and joining this adventure with me. Have a great weekend!
I considered making the switch from a 240SX to a 180SX for many years. Jimmy and I would often discuss making the switch, feverishly pounding numbers into spreadsheets in our spare time to see if it would be possible. In most cases, the numbers rarely made sense, but as the years went on it became more and more realistic that I could conceivably part out my 240 and pick up its JDM counterpart.
I never had too much of a strong desire to own a RHD car. Based on talking to friends and acquaintances about their experience with it, it sounded like kind of a hassle to drive one on roads designed for LHD vehicles. I also really loved the idea of modifying a 240SX to emulate a 180SX as closely as possible. It was fun to try to turn my car into the “cool” version and explain to people why I made the modification choices I did. I grew up in the era where it was very admirable to take USDM car and convert it over in as many ways as I could. However, as I grew older and began to want a car that was as close to stock and original as possible, the idea of starting with an actual late model 180SX began to sound more and more appealing. Instead of trying to undo all of the mistakes I had made with my car, I could start with the version I was striving to have all along.
Around the time that I started parting out my hatch, I saw that a black 1997 180SX Type X was for sale in Japan on Zilvia of all places. It felt a bit like fate when I saw it as it ticked nearly every box I was looking for – late model 180SX, sunroof, complete aero from the factory, turbo – the only problem was the fact that it was an automatic. If I was truly going to do this and spend the money and time to bring a car over from Japan, I felt it needed to have a manual transmission from the factory. I was also kind of excited to find one that wasn’t black for a change.
I talked to the owner of a white 180SX Type R that also had a sunroof, but discovered that it had a bit more rust than I was interested in dealing with. It was very appealing given that it was already stateside, but the price was very high. The more I thought about it and looked around a bit, I decided it might be worth compromising on the automatic transmission in the first car I came across. It was proving very difficult to find a car with a sunroof, and most auction cars were going to end up being a huge crap shoot. I decided to take a second look and reached out to the owner.
A couple weeks later, I was sending my first ever wire transfer to pay for the car. I’ll save some of the details on the car until it is in my possession (which may be quite a while at this rate,) but here are a couple photos of the car I purchased. I am currently in the process of making all of the arrangements to transport the car, and with any luck it will be stateside by the end of June. However, I am trying my absolute best to tell myself to be patient and realize it may not be around for this year’s cruising season. By sharing it here now, maybe you guys can help share the anticipation with me.
With a car secured, I began to source some parts so that I can have things in order and ready to go before the car gets here. While I sold a lot of the parts I had not knowing what the future had in store, I did keep a lot of my more desirable parts in the hopes that I would be able to import a 180SX. For example, I ended up holding onto my Xcessive Manufacturing skid plate as I had just recently installed a fresh one on my 240 (despite it already looking fairly thrashed.) This is an essential piece in my opinion as it’s virtually bulletproof and keeps your oil pan safe on a low car.
I also ended up holding onto my PBM Cobra downpipe from my coupe as it only has about 100 miles on it. It’s kind of tempting to keep the stock exhaust on my 180SX, but I will probably end up upgrading it shortly after the car arrives. This is another essential piece for a lowered car as the flex section keeps you from blowing out turbo gaskets as frequently. I think I have used these downpipes on my S13s since 2010 or so with great success.
S14/S15 front knuckles with ABS sensor provisions.
Another item I held onto was my S14 front knuckles and hubs. My plan was to continue utilizing S14 front knuckles, hubs and lower control arms on my 180SX like I did on my 240. As it turns out though, the 180 has ABS- something I would love to keep intact if possible. I ended up selling my S14 knuckle/hub setup in favor of an ABS set. I’ve got the knuckles now and have a new set of OEM ABS hubs on order. This will be my first time working on an S13 with ABS, but hopefully I am able to sort it out. Time will tell!
Manual Non-ABS driveshaft (top) vs manual ABS driveshaft (bottom.)
Speaking of ABS, this also meant that I needed to secure the correct driveshaft for manual swapping the 180. I ended up finding a manual/ABS driveshaft on eBay that was ironically located about an hour and a half from me. I feel like there are not typically a lot of manual/ABS driveshafts around stateside, so I was excited to find this as I wanted to avoid running an aftermarket one piece driveshaft. I’ll likely try to look into replacing the carrier bearing before this is put on the car. I’m still a little confused as they look remarkably similar, but hopefully this works and doesn’t come back to haunt me later.
These will need to be cleaned up and refreshed before making their way onto the 180SX.
I decided tackling the manual swap parts should probably be priority number one. In addition to the driveshaft, I also picked up a Silvia brake and clutch pedal. I have items on the way to refresh both pedals and will try to clean them up as best I can prior to installing them. It is going to kill me to hack into a totally stock 180SX, but I think we can all agree a manual swap is needed. Hopefully the process won’t be too bad (I converted my 240SX coupe from automatic to manual, so I am fairly confident I can pull it off without any issues.)
One piece I have always wanted is the NISMO reinforced clutch pedal bracket. Though I don’t drift and really have no use for it, my hope is to add as much of the current NISMO catalog to this car as possible. Pretty cool part that will likely serve no purpose, but I am excited about it.
I’ll get this cleaned up and refreshed before installation.
Next, I picked up a used shifter base plate from eBay for the manual swap. I am in the process of ordering some refresh items for this, including a NISMO quick shifter that I have heard good things about and wanted to try. I’ve always preferred the OEM shifter over the various short shifters I have tried over the years, but I am confident the NISMO should fit the bill. Looking forward to scooping one up.
I sold both of my manual crossmembers from my 240s, so I had to pick one of these up as well. I was sad that I just barely lost out on a brand new one on YAJ, but I can clean this one up just fine.
Of course, the 180 will need to be converted to five lug. I picked up a set of generic Contano five lug hubs for the rear as I had some pretty bad luck with the OEM ones and they cost a fortune. Hopefully these will serve me well. The OEM ABS S14 hubs are on the way and should be here sometime next week.
Finally, a deal I could not pass up – a set of Ganador Super Aero Mirrors. I have probably owned about fifteen pairs of these over the years, but I couldn’t pass up the price these were listed for on Zilvia. I am contemplating trying to find a really clean pair of carbon/blue lens Ganadors instead for the car, but I am not 100% sold on that idea just yet. The idea of having functional power Ganadors that I can actually see out of sounds really cool after years of using them on a USDM chassis and not wiring them up. I have another pair of mirrors on hand for the 180SX as well that I held onto from my 240 that will likely complete the collection of mirrors I intend to own. At the end of the day, I really like the stock power/folding mirrors the best (stoked to finally have a set of those that works as well.)
Anyway, that’s about it for this week! I’ll continue to share parts I collect and plans for the car here as I work my way through the long process of trying to get the car stateside. I am hoping to be as organized and well-equipped as possible to make the car my own before it arrives. I will likely try to enjoy it for a while in its stock form before I tear into it, but I am definitely excited to work on it and install my own parts.
Let’s see here… where do I begin this time around? Well, when we last left off in late October of 2023, I had just finished parting out my S13 coupe project and decided to focus my efforts on one singular project- the S13 hatch that I first purchased in 2008 when I was in college.
While I immediately felt very relieved to shed the coupe project and motivated to finally paint and restore my 240SX hatch, the enthusiasm quickly began to fade a bit. I decided to remove the side skirts to check for rust as they had not been off of the car in about seven or eight years. Much to my dismay, I found what I would consider to be a fairly large amount of rust behind the side skirts. Despite people reassuring me that it was not bad in the scheme of things and could easily be repaired, it really took the wind out of my sails to make that discovery.
I get it: S13s are pretty old and Nissan metal isn’t known to be the most resistant to rust. But finding that my rockers were in rough shape was sort of the straw that broke the camel’s back for me. A lot of people online saw my decision to part out the car and move on as a knee-jerk reaction to finding a little bit of rust, but it was the culmination of many years of regret. Many years of decisions, modifications and mistakes that I had grown to regret. I shaved the bay and welded everything shut only to cut it back out and try to convert it back to factory specs again. Removed sound deadening just to add it again. Removed the HVAC system and reinstalled it. Pulled the quarters as a young twenty-something a lot more than I would have liked as a guy pushing forty. And though most of these things could be reversed by repainting the car, I ultimately decided it was time to make a change, take a risk and shake things up. If I was really going to pour all of this time and effort to try to build a beautiful S13 to my standards, I started to wonder if it made sense to start with the real deal: a late model 180SX.
Around the same time I discovered the rust, I took another leap of faith by applying for and accepting a new job. I was very happy at my role at the time, but the commute was brutal- typically an hour and a half or more one way due to construction. I ultimately decided to apply for a different role at a company twenty minutes from home and was thrilled to learn that they were making me an offer. My start date was pretty close to my birthday in December, and it just felt like a big shake up for the better. Taking a risk had worked out for the best. Birthdays are often a time of reflection, especially as I get older, and it got me thinking that maybe it was time to part ways with my hatch as well and take another risk. It was scary, but it felt like the perfect time to make the switch.
So I ended up doing just that – I parted out my S13 hatch again just like I had back in 2012. I was greeted again by that familiar feeling of relief with each set of parts I sold and shipped out. I went into the process with the mindset that I would be importing a kouki 180SX to replace my 240. The goal was to find one as stock and clean as possible – with the least amount of rust possible as well, of course. I knew this was a risk and that I may not find an example that ticked all of the right boxes for me, but I decided that with the way I had been feeling about the hobby over the last year or two it was worth the risk. If I didn’t find the right car, I would simply cash out and enjoy the simpler life many of us often dream of – a life without modifying a car.
Just as I was becoming more and more comfortable with the idea of not owning an S13 anymore, I stumbled upon a car that ticked just about all of the right boxes for me. I am very excited to say that I am in the process of purchasing that car and jumping through the hoops to bring it home to my little garage in the USA. I’m sure it is going to be a relatively long and tedious process that will require more patience than I have to give, but I am hopeful that it’s all going to pan out as it should. Fingers crossed!
As of this writing, I am essentially done with parting out my S13s. I am hoping a friend of mine can come get the bare shell out of my garage soon, but aside from that nearly everything is gone. I kept a number of parts from my hatch to use on the 180SX, and am still holding onto some of the harder to find Silvia parts for a while just in case I end up with one someday. Unlikely, but it shouldn’t hurt to keep these parts around.
With any luck, I’ll be able to share some details about the 180SX in my next post if things continue to progress as they should. I’m hoping to start posting more regularly to document the parts I am gathering for the car while waiting for it to make its way here on a slow boat. It’s been a while since I have tackled the build process from scratch, but I am looking forward to experiencing it again – especially with this platform. It’s nice to have some time to put a plan together and gather parts before the car arrives.
Thank you as always for stopping by and joining me in this journey. I am really excited about what’s to come in 2024!
It’s been a while my friends! Man, life sure can be crazy sometimes. I can’t believe this is only the second blog post I have made in 2023. After getting an email informing me that my hosting fees are going to be charged to my account soon, I realized it was probably time to get back to utilizing this space again and stop throwing my money away. Let’s get caught up a bit!
It’s no secret that I have not felt very motivated when it comes to my S13s in 2023. Kind of ironic for someone that coined the phrase “Unwavering passion for S13,” but I think it’s the reality for just about all of us. I think in many ways the trouble started when I decided to take on building a second car before I even managed to “finish” the first one. I told myself the typical things we all do when I got my coupe chassis back in 2018:
“I’ll just get the shell now and keep it until I have time to build it.”
“I know I should only focus on one project, but I’ll just get things for it as I have the time and funds.”
“If I don’t get one now, I may never get the chance to own one again.”
Of course, it’s hard for me to not hit the ground running when it comes to building a car. It’s a blessing and a curse, really. Things escalated quickly, and before I knew it I had two cars at about 90% completion. All of the desirable and hard to find parts were there for the most part, but I just couldn’t seem to come up with the time, money or motivation to get either car across the finish line. I had fallen into the same trap I had always warned other enthusiasts to be wary of. A lack of money and feeling discouraged about the visual state of both cars was definitely killing my enthusiasm.
I mean no offense by this, but I have never been a hoarder or a collector. I have seen lots of people like this in our scene over the years: the ones with a giant collection of the rarest items in their basement without a car to install them on. Conversely, there are lots of people that own 3 or 4 or 7 or 12 cars, but none of them are necessarily something they can feel proud of. None of them are finished. Sometimes none of them even run. There’s nothing wrong with this of course – we should all be free to enjoy the hobby however we see fit. But for me, neither of these situations has ever been ideal or something I was seeking out. By building the coupe, I sort of fell into both – I was hoarding parts in my basement like moldings and weather stripping for a rainy day. At the same time, I had two cars- neither of them really in a place to be considered roadworthy or polished.
I put a fair amount of miles on my hatch at the start of the season and was really enjoying it. My wife and I even took a summer road trip up North to the lake house in the car and had a great time. The coupe was sitting waiting until I had the funds to buy a set of 17″ wheels for it as I did not like the look of my 17/18 TEs. As fate would have it, I started having some issues with the hatch. I noticed one night that the car was smoking heavily at idle after a long drive. The rear tires were bald, which should not have happened nearly as fast as it did. After some inspection, I noticed that my rear toe was somehow way off. I got fairly overwhelmed and frustrated even at these small things because they both meant spending money I didn’t have. As a result, I now had two cars sitting and collecting dust.
Another big life event happened in May of 2023. I had some surprise medical/educational bills arise for a member of my family that I simply could not afford without parting ways with items from my cars. I did not want to take on any debt, so I decided to part out the suspension and brakes from my coupe to cover those expenses. It was not an easy decision and I was pretty upset and depressed about it at the time, but I knew I was making the right choice for my family. As a parent, sometimes you have to step up and make sacrifices. This was a big test and challenge for me, but I felt very fortunate to be able to provide in that way.
As summer continued and began to transition into fall, I knew I had to make a change. I had been stressing and thinking for months about how I was going to climb back out of this hole. After telling myself to just let both cars sit until I had the money and my passion had returned, I finally accepted that I needed to make a change. I bit the bullet and decided to part ways with my S13 coupe project. It was a really difficult realization to accept, but the fact that the car had been sitting on jack stands with no plan for being operational again made it a bit easier.
I tore into the car in early September and began listing items for sale. By mid October, just about everything was gone and I was ready to sell the rolling chassis. I ended up selling it to a really nice guy I connected with through Instagram (@infamous_twotone) and I feel really good about him getting the car. He came and picked it up last Sunday, and I immediately felt such a surge of relief. I swept out that side of the garage and immediately pulled Alicia’s van into the garage for the first time since the winter.
At last, the burden of trying to own and maintain two project cars at a high level was gone. Once I dove into parting out the car for good, I felt immediate relief. I know there are people out there saying “you’ll definitely regret it,” and in some ways I know they’re probably right. But at the same time, I know I did what was best for both my mental state and for my family at the time – and that feels really good. I had no idea how much owning two of these cars was wearing on me. It was adding a lot of stress that I didn’t even realize was there. If you are struggling with multiple projects and that strong feeling of trying to avoid letting go, I highly encourage you to take a break for a while. If that doesn’t seem to be helping, I would try downsizing your collection and focusing on one project. I know I am only a week into it at this point, but it’s so validating and freeing to lose some of the stress and feel productive and passionate again.
That being said, I didn’t fully shed my newly acquired hoarder tendencies just yet. I elected to keep a number of parts from the coupe that have become pretty hard to get a hold of these days including the dash and defrost vents, Silvia front end, aero kit, and moldings/weather stripping. I also kept my new-in-box Silvia lighting. There’s a chance I will part with these items eventually, but I wasn’t in a dire situation where I had to sell them right now and decided to store them away just in case I find another use for them one day. Time will tell how long this idea sticks.
All said and done, five years later, do I regret owning the coupe? Yes and no. I had an amazing experience putting together my second S13 build and feel so fortunate that I had the chance to do that. Even if I didn’t get to finish it like I wanted to, I do feel a sense of accomplishment to have put together what I did. I’m hoping I might have another chance to own a coupe or an S13 Silvia someday, but that thought is definitely going to be put on hold for quite some time – at least until my house is paid off. But my kids are going to be starting college shortly after that, so I highly doubt money is going to be growing on trees for me any time soon- not to mention that mental strain I was talking about earlier in the post. For the foreseeable future I am definitely a one project kind of guy. I learned a ton about myself from the experience though and I am really glad it happened, even if it distracted me for a few years.
So what about the SR20DET drivetrain from the coupe? Well, I am working on finalizing a deal with a friend of mine to take that drivetrain and turn it into a full paint job for my hatch. I won’t be taking the car in for paint until the spring, but I am beyond excited to finally accomplish a goal I have had since I bought the car in 2008. I am really eager to tear into the hatch and start getting everything ready to go while adding some new touches to the build along the way. It should be an awesome winter.
My motivation is in full swing right now and I couldn’t be more excited! I’ll dive into some of the plans I have in my next post. I may backtrack just a bit to try to really have a clear record of 2023, since in a lot of ways that is the reason I like to maintain this blog. But then I will be ready to move onward and upward! Things are beginning to start rolling and I am really excited.
Thanks as always to anyone that manages to still read this. The random messages I get from people that enjoy or have enjoyed this content over the years definitely fuels the fire I have for tinkering with these things in the first place – so thank you! Have a great weekend.
The older I get, the more difficult it becomes to devote any amount of time to car related activities between mid-November and mid-February. It’s such a busy season with lots of birthdays, holidays, and family gatherings. For myself and many others, it’s also a time when budgets tighten. I get hit with a lot of large bills during these months due to when my wife and I’s birthdays fall. Add to that Christmas and birthday gifts (and even several surprise medical bills this time around) and conditions just have not aligned for me to be doing much with my S13s. Limited time, limited budget, the day to day duties of parenting, and winter weather are all factors that combine and feed off of each other. It gets hard to find a balance and everything can pile on to kill my motivation quite easily.
However, I am pleased to say that it’s a new day. While it’s already mid March and I haven’t done much at all to the cars in the last three months, I can feel the motivation and excitement beginning to build. I’m slowly starting to poke my head out of hibernation, improve my mental state, and show interest in my cars once again. The simple fact that I am here updating my blog feels like a great accomplishment and a sign that things are trending in the right direction. With spring and warmer weather (soon hopefully) will come a renewed sense of enjoyment for the hobby.
So let’s backtrack a bit. Back in late November, I had just gotten a hold of another Koguchi Power bonnet. I did a quick “test fit” of sorts purely just to grab some photos and see what the hood looked like with OEM kouki 180SX aero. There are plenty of examples out there, but I had never seen my car with this combo installed at the same time before. I was disappointed to find that it almost feels like the quality of Koguchi Power hoods has gotten even worse since I last owned one in 2015 or so. It’s a really cool piece, it just takes so much work to make them actually look nice from a fit and finish standpoint. More on this later…
I tossed the car on jack stands for the winter to address a few general maintenance items. Aside from the new hood I didn’t really plan to make any big changes during the off season this year. I started by removing my turbo and exhaust manifold to refresh all of the gaskets. I had noticed a slight exhaust leak developing from somewhere near the manifold and decided to just bite the bullet and replace everything. While I tore it apart back in December, I didn’t get around to reassembling it until about two weeks ago.
It feels awesome to have the turbo back on the car.
I found that the hardware for both my O2 housing/downpipe and the turbo had been backing out. The gaskets were still largely intact despite this, but it was definitely the source of the leak. Considering the fact that I got about seven years and 20k miles out of the setup, I can’t be too mad about it. I installed all new OEM gaskets including an S15 metal exhaust manifold gasket. I debated using Nord Lock washers exclusively for the turbo to manifold nuts, but ended up just using the trusty OEM locking tabs. I managed to snap a stud on my exhaust manifold during removal, so I took the easy route and bought a replacement, spray painted it, and bolted everything up.
Already kicking myself a bit for letting these go, but it was hard to resist…
I finally scored a decent pair of 180SX power folding mirrors and a switch from Zilvia legend Johnny. I’m hoping to find the time to wire these up this spring before I get the car back on the road. The older I get, the more I prefer the looks and functionality of the factory mirrors on a tastefully modified S13. In fact, I ended up selling a couple pairs of East Bear mirrors over the winter. I wanted to hold onto a pair just to have in my collection, but I couldn’t pass up what people were willing to pay for them. They’re awesome looking mirrors, but the quality does leave a bit to be desired.
You may recall that I re-relocated (is that a term?) my battery from the hatch back into the engine bay last summer. When I shaved my engine bay, I removed the stock tray as it was pretty rusty. Well, when I removed the battery for winter, I found that it had destroyed the paint in my engine bay. Oops. I’ll have to come up with a temporary solution in the mean time, but I was able to source a replacement battery tray from Japan. Eventually I would like to have this welded back into the stock location like on my coupe.
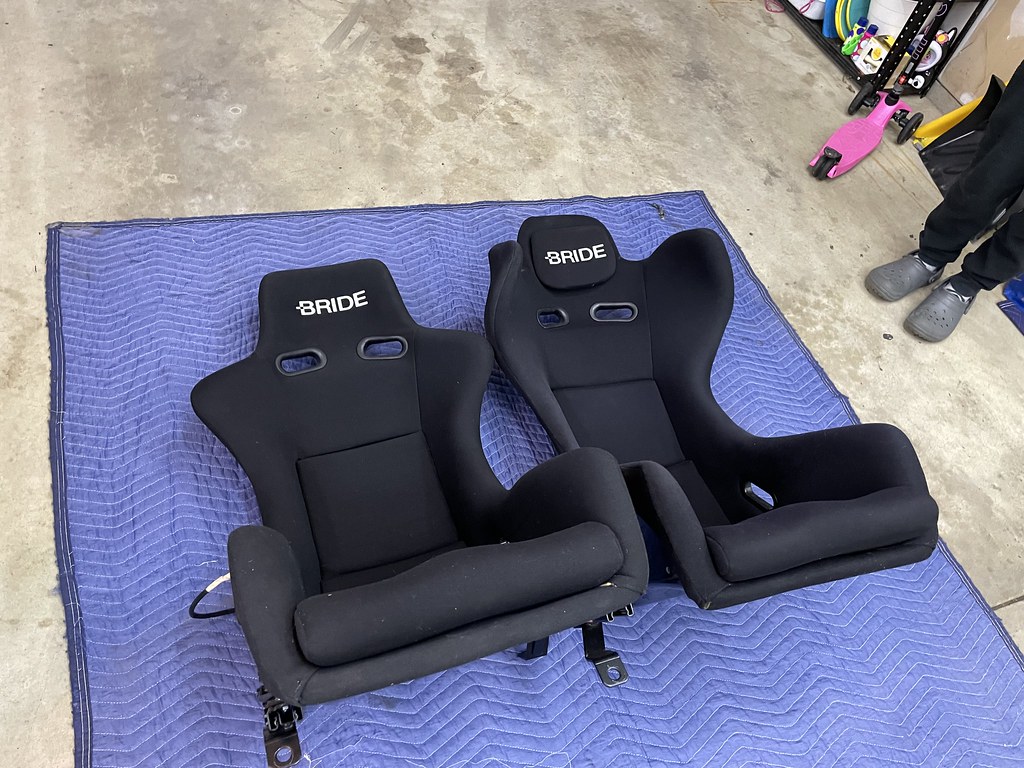
In January, my good friend Brett from Florida reached out to me and offered me a smoking deal on a black Bride Maxis. I didn’t really intend on owning one of these again, but the deal was too good to pass up. Thank you Brett! My local S13 homie Nick came by one Saturday to hang out and eat some White Castle, so we decided to bolt the seat into my hatch to check it out. I’ll always love the look of these seats. I’ll be holding onto my kouki 180SX seats should I want to swap them back. I’ve always felt the Maxis and Zeros look best with a Brix next to them, but I think I can live with this for right now. I’ve been debating if I should put the Zieg II in the passenger side of the hatch, but I think it will find a home in my coupe so that both cars will have a proper period-correct Bride bucket in them and offer a similar driving experience.
I acquired a few different parts over the winter in addition to the Maxis. A RHD Japan order came in with two 25mm Works Bell steering wheel spacers, two Bride FG seat rails, and some Cusco hood pins like I used on my previous Koguchi Power bonnet. I purchased left and right Bride seat rails so that I can install my Zieg II as either a passenger seat in the hatch, or a driver’s seat in the coupe.
Before spacer install.
After Works Bell 25mm spacer installation.
A few nights ago, I snuck into the garage and installed the steering wheel spacer on my hatch. Wow, what a difference! I was so tired of having my arms nearly fully extended to reach the steering wheel with a bucket seat. I wish I had discovered this a long time ago. I haven’t gotten to drive with it yet of course, but it should be a great improvement.
I also spent some time working on getting my Defi gauges functional once again. I was able to install the GReddy sandwich plate, NISMO oil filter, and all four sensors in the engine bay a week or so ago. I need to go back and finish running the wiring, as well as wire up and mount the controller. But the feeling of having the sensors installed if nothing else is a good one!
Ahhh… all matching factory clips.
As for the coupe, the car is still in winter storage. I was able to source replacement clips from Japan for the Silvia trunk carpet that I installed a while back. This was a nice find since I thought they were discontinued. I also finally received my StopTech front brake pads for this car that I had been waiting on for about ten months, so I’ll swap those on this spring. I know I sound like a broken record, but I still want a full set of 17″ wheels for this car. Every time I get close to pulling the trigger, I need the funds for something else. I am looking forward to bringing that car home this spring and – with any luck -finally realizing that goal. I’ll also install the Bride Zieg II, Bride FG seat rail, and Works Bell 25mm steering wheel hub spacer when I bring the car home.
It looks like some decent weather is on the horizon, so I am excited to get back into the garage a bit. I decided this week not to keep my Koguchi Power hood, so a friend is coming to pick that up this weekend. I’m still a little hesitant since it is such a cool piece, but I think it makes the most sense right now to move on from it and focus my funds and energy on finally getting a set of wheels and tires I love for the coupe. Hopefully I can keep the progress flowing!
Good luck with your projects this weekend and finding that elusive motivation. Remember that spring is just around the corner! Thank you as always for stopping by- I appreciate it!
After spending the better part of the last 18 years with a passion for modifying cars and some sort of project goal that I am working towards, I have learned that this time in mid to late November tends to be one of high hopes and high motivation- at least for those of us building cars here in the Midwest. Most of us have just gotten our cars put away for the harsh winter months ahead and no doubt have some shortcomings we experienced with our vehicles during the season that we now finally have the time to address. I know with my own cars, it was often a mechanical failure or issue that forced an end to the season- sometimes a bit earlier than I would have liked.
While it’s not true for everyone, the winter off season provides us with plenty of time to work on the next round of improvements for our builds. If you didn’t managed to get your car out at all this year, it signals a clean slate- a fresh opportunity to spend the next five months or so getting it together to ensure that you don’t meet the same fate next seaspn. I’ve been in that boat as well in the past.
Whatever the case for your specific situation, there’s no denying that one event this time of year can make us all feel a bit more hopeful and motivated for our projects- Black Friday. It’s easy to think that throwing a few thousand dollars at that shell sitting in your garage during the last week of November is going to be the saving-grace that helps you get across the finish line and finally lands you with a car you can be proud of. And hey, you might even save a few dollars and score a free t-shirt in the process.
I’ll be the first to admit that I have fallen prey to this mentality many times in years past. Vendors can convince us that our lack of activity, motivation, and progress during the past year can be cured by capitalizing on special savings. To be honest, it almost makes you feel like you are missing out if you don’t buy something for your car on Black Friday. Only in the last few years have I managed to make it through without spending a dime and feel OK with it.
While there’s no doubt there may be some great deals to be found out there, don’t let yourself get sucked into spending a lot of money on that junky old car that’s been collecting dust for as long as you can remember without first coming up with a plan of attack. I’m not saying it is always a mistake to make purchases during the notorious holiday shopping season, but I’ve seen a lot of people spend tons of money on parts they got during Black Friday sales mistaking spending for motivation- only to abandon the project a few months down the road and sell everything at a steep loss.
My advice to anyone out there trying to build a car right now (specifically an S13) is this: come up with a plan. It’s always best to go into any long-term project with a detailed idea of what you want to accomplish and how you plan to go about it. I always find it helpful to split the build into categories and tackle them one by one: Drivetrain, Suspension & Brakes, Interior, and Exterior. Come up with a blue sky list of what components each category would include, then go back through for a second sweep to rule out things that aren’t must-haves or may break the bank from a budget standpoint. It’s important to prioritize- and even plan for multiple stages of the build if it’s helpful- to get you on the road as soon as possible. There’s no connection with a car you’ve never even driven, and that makes staying motivated pretty difficult.
With my cars for example, I have sacrificed things like having a cool Japanese-branded clutch or suspension arms in favor of having genuine JDM OEM aero components. While I have a specific mentality and set of standards I like to maintain with my vehicles, I’ve had to take a step back and prioritize which things mean the most to me in recent years- especially with owning two of them. I don’t have the funds to do everything I want to, especially not all at once- so I have to make compromises on certain areas to get other aspects of the build where I want them. Compromising on certain parts doesn’t have to mean cutting corners.
Once you have a plan, put in the work on the car itself. Don’t mistake spending for motivation. While it may work for some people to drop some serious coin and harness motivation from it, if you haven’t touched the car in six months and don’t feel like putting in the time and effort, spending a few thousands dollars on parts that are just going to collect dust isn’t likely to make you feel any more love for the project. It’s easy to dig yourself into a hole financially that will only lead you down a bad path- one that often ends in selling the car and quitting the game completely.
I get it – there are sometimes going to be key components that you need to buy in order to make progress on your build. I definitely understand this and have been there many times. You’ll find that there’s just no way to move forward without certain components, and you’ve got to save up and make those purchases when you’re able to to make progress. Those are the types of parts you should be trying to score on Black Friday. Spend the minimum needed to get you through those next several tasks on your to-do list, combine it with a healthy dose of time in the garage, and you’ll probably see massive strides in the project. Sure, you may spend $20 more on a part six months from now than you could have gotten it for this week, but are the savings worth derailing the entire project?
I don’t exactly know where I was trying to go with this post, but I guess I wanted to share my two cents as this has been on my mind a lot watching all of the Black Friday deals fly in on Instagram over the last week or so. I chat with a lot of younger folks on Instagram trying to put their cars together and thought they might like hearing an old timer’s take on the subject. I’ve been there before and it’s still something I struggle with getting sucked into at times.
In any case, do what you will with one guy’s opinion. Have a detailed idea of what you want to create. Make a spreadsheet to track what you need and a checklist with the tasks you need to complete. Once you get rolling and can celebrate some wins, the motivation piece will probably take care of itself.
Thanks for stopping by as always and good luck with your build. Have a safe and Happy Thanksgiving!