
The condition of the moldings (or trim as it is often referred to) on my S13 is one of those things I have never really noticed or paid much attention to over the years. I guess that way of thinking was helped by the fact that most of mine are in relatively decent shape being that this car has spent the majority of its life in the midwest where sun damage is not really an issue. It wasn’t until I traveled a bit and saw some of these cars residing in Southern states that I began to notice these details and how amazing a 240SX can look when these items have been replaced with brand new ones.
Once I began to pay closer attention to the moldings on my car, I couldn’t get the blemishes out of my head. I knew that if I was ever going to paint this car, I would have to replace the moldings as well- all of them. Fresh paint looks great, but it only makes the flaws with your trim that much more noticeable. With a hunch that most of these items were currently or soon to be discontinued, I decided there was no time like the present to begin my search.

Since my windshield molding is in the worst shape, this is where I started. After some research I ended up ordering the OEM Nissan reveal molding, reveal molding retainer, and glass dam. Based on my understanding of windshield installation, these are the components needed to install a new windshield properly with genuine Nissan components. I learned recently from a friend that most glass shops can install a generic rubber molding strip that is much more cost effective and doesn’t look bad by any means, but I am OCD and let strange things like this bother me for some reason. My windshield has been covered in chips for years so I am looking forward to the day that I can install a brand new one with these moldings.
 Discolored reveal molding and a brittle molding retainer that’s losing its shape (which has resulted in rust forming along the roof.) This area is what sparked my desire to attempt restoring the car.

I decided to work from the front of the car to the back meaning that the side windows were next. I started by finding the moldings located at the bottom of the windows known as the belt weather strip. You probably know these as the little piece of rubber that has been flapping in the breeze on your door since you bought your S13- I know mine have! Nissan must have revised these at some point down the line to remove that little piece of rubber where it extends past the glass. Hopefully this helps them last longer this time around.


There’s a long piece of metal that runs along the upper portion of the glass on the roof known as the weather strip retainer. These would probably be easy enough to repaint if yours are in good condition, but they do feature a small piece of rubber where they meet the rear quarter glass. Mine have several dings and stone chips in them, so I elected to replace them entirely. You won’t be able to find these anymore stateside unfortunately, but it is still possible to get them if you do your research.

 The small rubber portion of the weather strip retainer where it meets the rear quarter glass. There is a similar strip of rubber at the bottom of the A pillar near the fender.

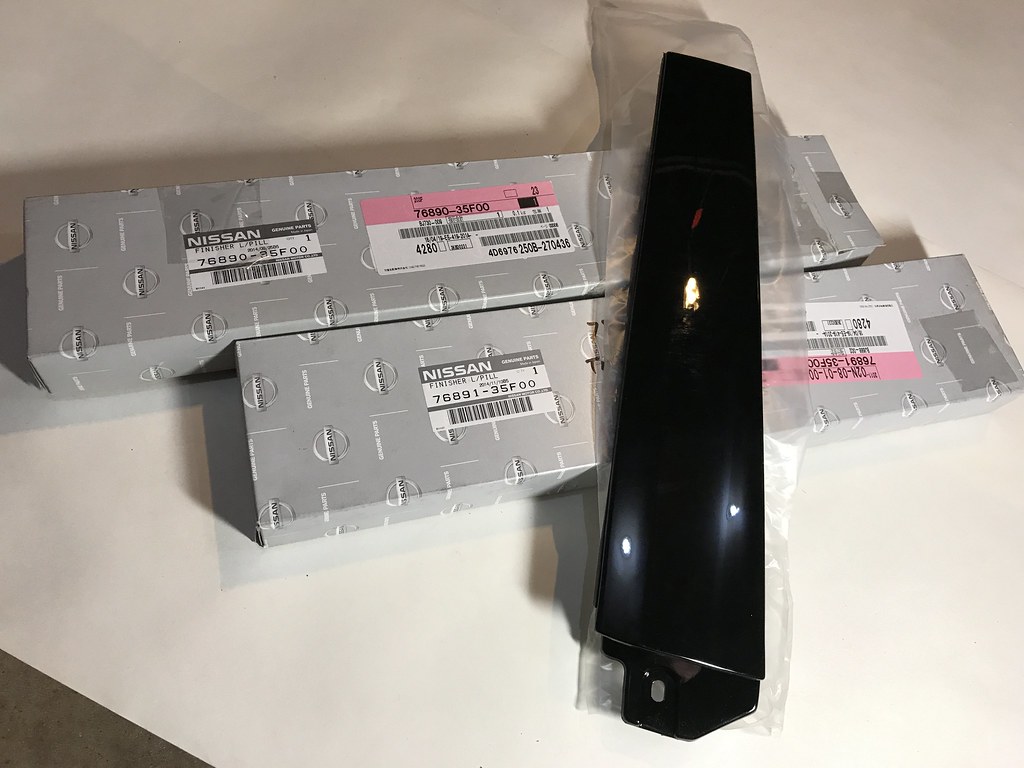
I am really excited about the next item I was able to get my hands on- the B pillar covers. Mine have looked terrible for a long time now and I have always debated painting them, but for whatever reason I have left them alone. Fortunately I was able to source brand new units from Nissan. The contrast between the used ones on my car and the brand new pieces is pretty wild. The only bummer about these is that they scratch incredibly easily- so much so that mine were scratched slightly in transit. Who knows how many times they have been shuffled around from warehouse to warehouse over the years. However, these will still be a huge improvement over my current ones and should really add a lot to the car when it has been repainted.
 The B pillar covers have taken lots of abuse over the years.
Another molding of mine that has been cracked and damaged since I bought my car in 2008 is the glass panel spacer surrounding the sunroof. I had always assumed that these could not be purchased new, so I never even bothered to try fixing it until recently. Thankfully this is one of the more affordable moldings out there and it isn’t too hard to track down here in the states. I’m told that replacing this piece is pretty difficult and some sot of adhesive is recommended, so we’ll see how it goes when I attempt it. I have been considering replacing this seal now before the car is painted since the sunroof glass is easily removed for paint, but we’ll see- I might hold off and do everything at the same time. Sidenote- I have sourced lots of other replacement components to restore the sunroof that I will detail in a future post.

 This piece has been flapping in the breeze for nearly a decade. Also note the blemishes on the sunroof hinge- more on addressing that and other sunroof components in a future post.

Making our way around to the back of the car, the next molding to address is the one surrounding the quarter glass. Unfortunately this one is virtually impossible to replace as my research has taught me that Nissan never sold the molding on its own- it was only available when purchased with the complete glass. Since the quarter glass is very expensive and discontinued, this does not leave many options. I may need to try some SEM product here to revive them a bit- even though mine are actually in fairly solid condition. I might have a trick up my sleeve for these though- we’ll have to wait and see how things shake out.

Finally, the last molding on the car is the rear hatch glass reveal molding. This one is not for the faint of heart and has been discontinued here in the states. Mine is in pretty rough shape with peeling paint and some areas where it has been bent over the years, so this was another must-have for me. I ended up sourcing the reveal molding as well as the lower molding retainer- a small rubber seal that runs along the bottom of the hatch separating the glass and the metal of the hatch itself. Mine was painted over at some point and has become a source of rust, so it will be great to repair this someday when the car gets painted.
 Good from far, far from good.
 Close up shot detailing the bottom of the rear hatch molding where it meets the quarter glass. You can see the hatch molding is bent, chipped up, and in rough shape. The clearcoat is peeling where the body meets the quarter glass molding.
 The lower molding retainer is a small rubber strip that runs between the reveal molding and the metal hatch area. The body shop painted over mine at one point when my hatch was painted and it’s now beginning to crack in several places. You can also see that it has never been wet sanded…


Window moldings are one of those things that are not cheap or easy to replace and will likely not be noticed by most. However, for those of us with a case of major OCD, a proper paint job would not be complete without replacing them. It might be years before I am able to utilize them, but it feels good knowing I have these tucked away for when the day finally arrives. It’s likely that these will continue to slowly disappear as each item continues to be discontinued so I wanted to plan ahead and secure them all now for the future.
Thanks for stopping by!
Damon
Hopefully this information is useful and you’re enjoying these posts. If you have questions or want to know more, feel free to shoot me an email at Damon@camryonbronze.com and I’ll do my best to help.

Pingback: S13 Windshield Molding Replacement | CamryOnBronze
Hey I was wondering where your found the rear reveal molding I can’t find it anywhere
Hey Paul! I sourced it from Japan about 6 years ago. I am afraid they’ve since been discontinued from my understanding.